What is Multi Analyser?
Multi Analyser is a simple frequency analysis device that allows up to 4 tracks to be viewed and measured in a single device. This can be particularly useful when mixing as it will allow for problematic/clashing frequencies to be visually identified and compared to each other.
Live 10
Multi Analyser makes use of a new feature of Live 10 whereby Max for Live devices now support multiple audio inputs and outputs. Inputs and outputs can be accessed via the track’s input and output channel choosers. Devices can also be routed to arbitrary tracks via the Live API.
This means that as well as hard routing a tracks output to a Max for Live device or routing content of a Max for Live device out to dedicated track input, we can also grab the output of a track and send it into in Max for Live Device without disrupting its current signal flow (i.e. to Master). This is great for analysis and measurement tools but also it allows Max for Live devices to have side-chaining functionality, which was previously not possible.
System Requirements
Multi Analyser requires Ableton Live 10 and a version of Max for Live will also be needed either with Ableton Live 10 Suite or Ableton Live 10 Standard with the Max for Live extension. Multi Analyser will not work in Live 9.
Download from Isotonik Studios
How does it work?
When Multi Analyser is placed on a track with an audio output, it will automatically use that tracks audio signal as the ‘current track’ frequency visualisation.
All tracks are monitored Post-Mixer.
 If the device is moved or copied to another track, it will update the current track menu. If this does not happen immediately, simply click the ‘R’ button to the right of the menu to reset.
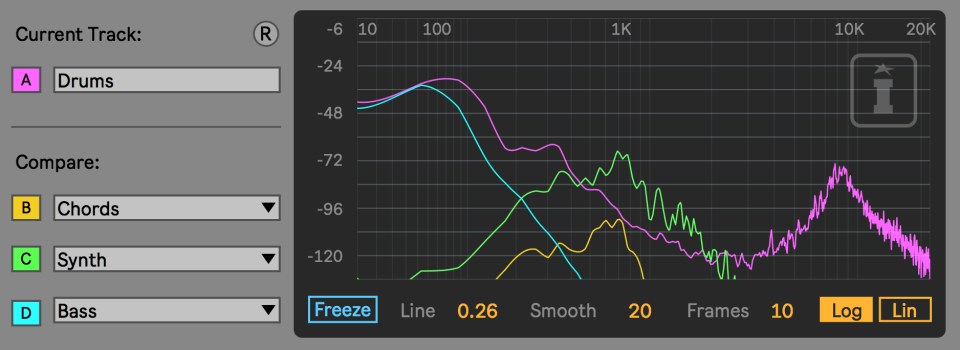
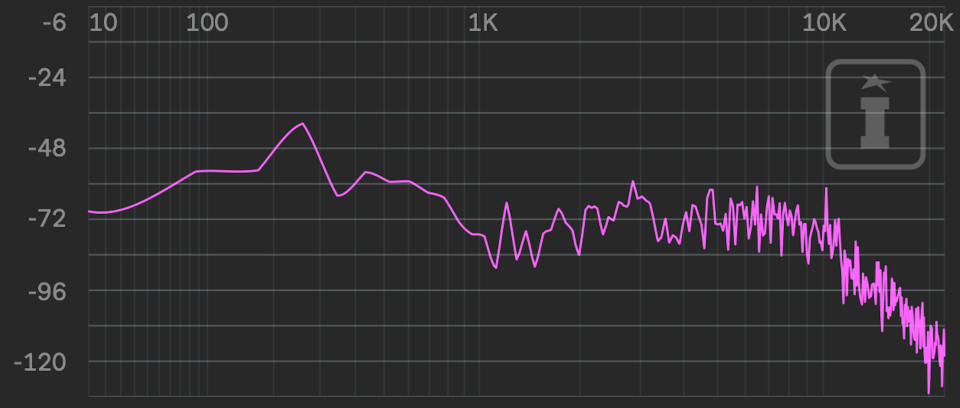
The current track is represented by the pink line on the frequency graph:
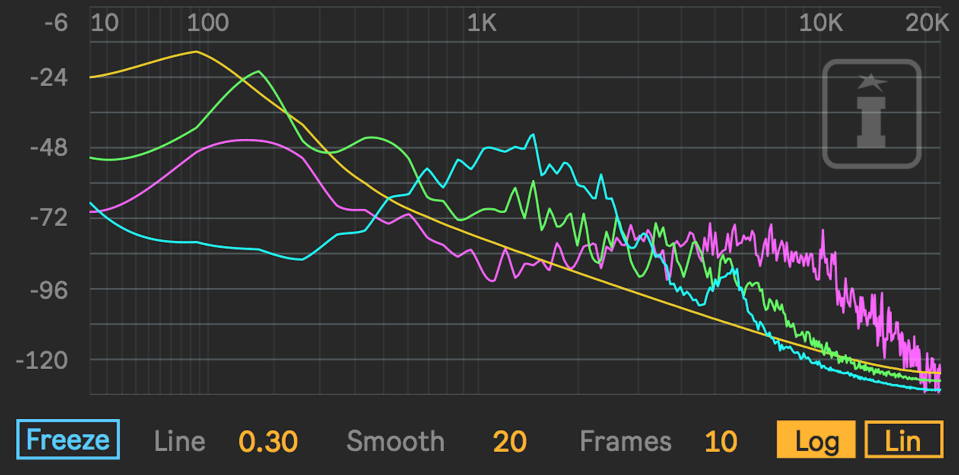
 Using the menus below, up to 3 more tracks from the current Live set are selectable and will be represented on the graph as yellow, green and blue lines respectively. Any of the four tracks can be bypassed using the coloured buttons to the left of the menus, A, representing the current track, B, C and D representing the comparison tracks.
The graph to the right of the device displays the frequency spectrum of the selected tracks in real-time. The X axis represents frequency measured in hertz and the y-axis represents amplitude measured in decibels.
At the bottom of the graph are some additional options for customisation:
Freeze pauses the display.
Line Controls the thickness of the lines on the graph.
Smooth applies a sliding function to the lines creating smoother, more gradual movements instead of faster peaks.
Frames determines the frames per second for display updates when visualising an audio signal.
Log/Lin switches the frequency elements of the graph between logarithmic and linear analysis.
How was it built?
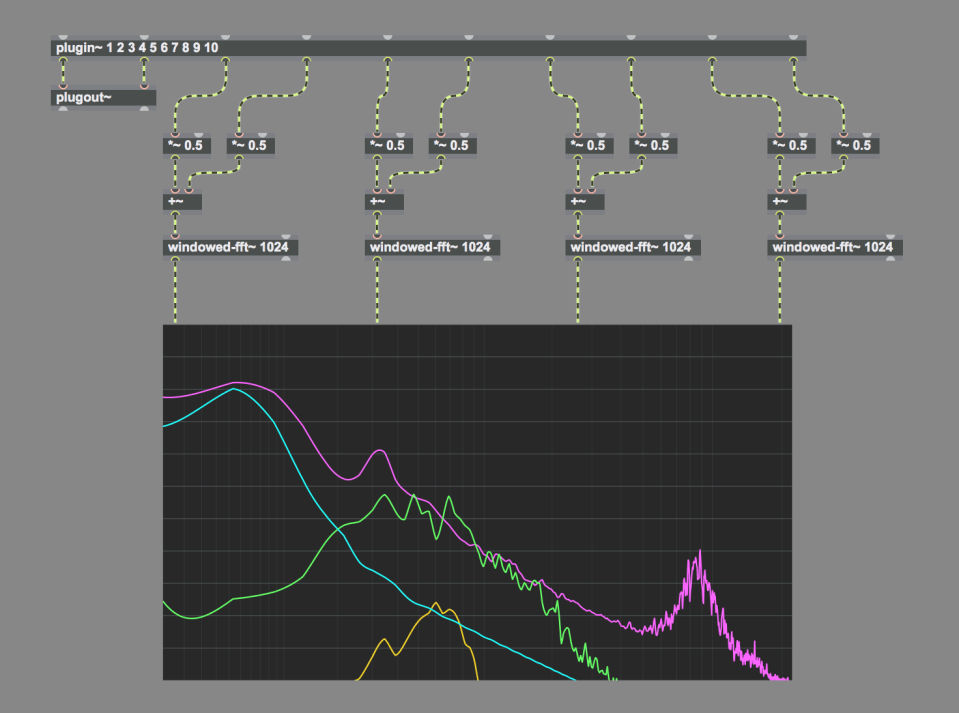
The Multi Analyser device uses the Max for Live plugin~ object to route audio into the device from separate Live tracks. Each of the four inputs is first process using the Fast Fourier Transform (FFT), which translates audio data from the time domain into the frequency domain. The FFT outputs are then routed into a separate plot inputs on the plot~ object which allows for various two dimensional data to be visualised. Plot~ is essentially the multi analyser here and we have Cycling ’74 to thank for that.
API
One of the great new features in Live 10 is the ability to configure multiple inputs and outputs on Max for Live devices. To add functionality to a device whereby tracks in Live can simply be selected from the device itself, we need to explore Live’s API.
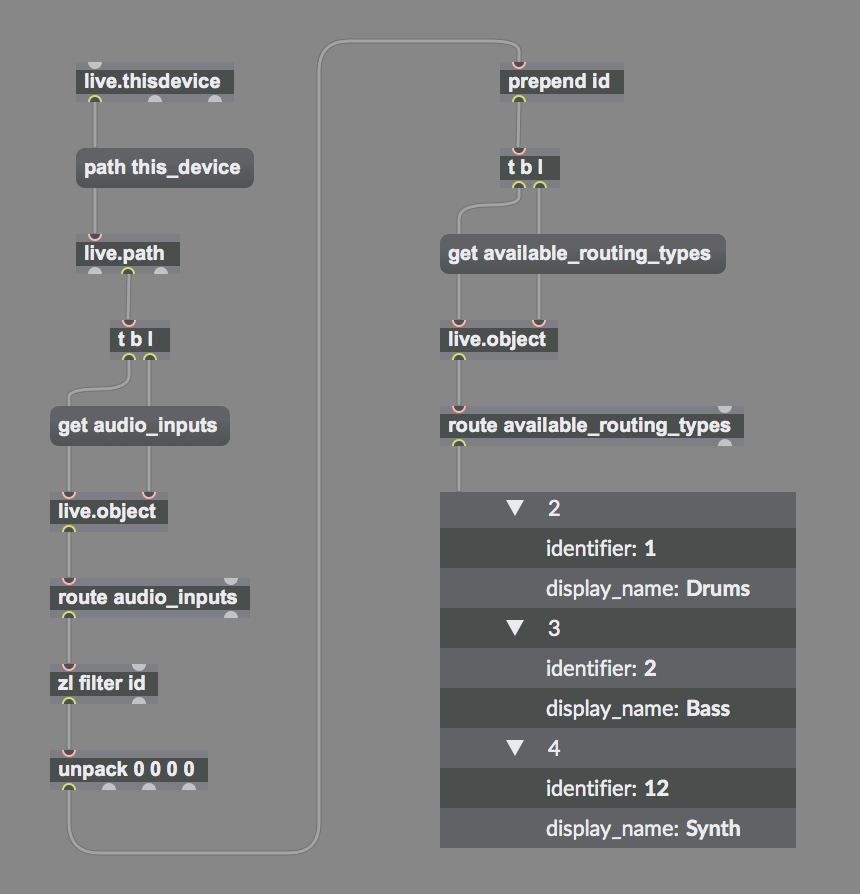
 Using a live.object that represents ‘this_device’ we can get the property ‘audio_inputs’. Providing we have a ‘plugin~’ object in the device, and in this situation, with four stereo pairs set up as arguments (1 – 8), the live.object will output an ID for each of the stereo pairs.
Using this ID with a live.object we can now get and set various properties such as which track’s audio output it is linked to and whether the channel routing is pre-fx, post-fx or post-mixer. Essentially, we can select any track in Live which has an audio output and route it to one of the stereo pair inputs on plugin~.
When making enquiries to our live.object that represents one of the stereo pair inputs such as ‘getinfo’, the results inform us that its properties are in the dictionary format (dict). This means we will need to use the dictionary objects to both interpret and format requests. Using dict.view can be very useful here to quickly check the properties of our audio input and what options are available.
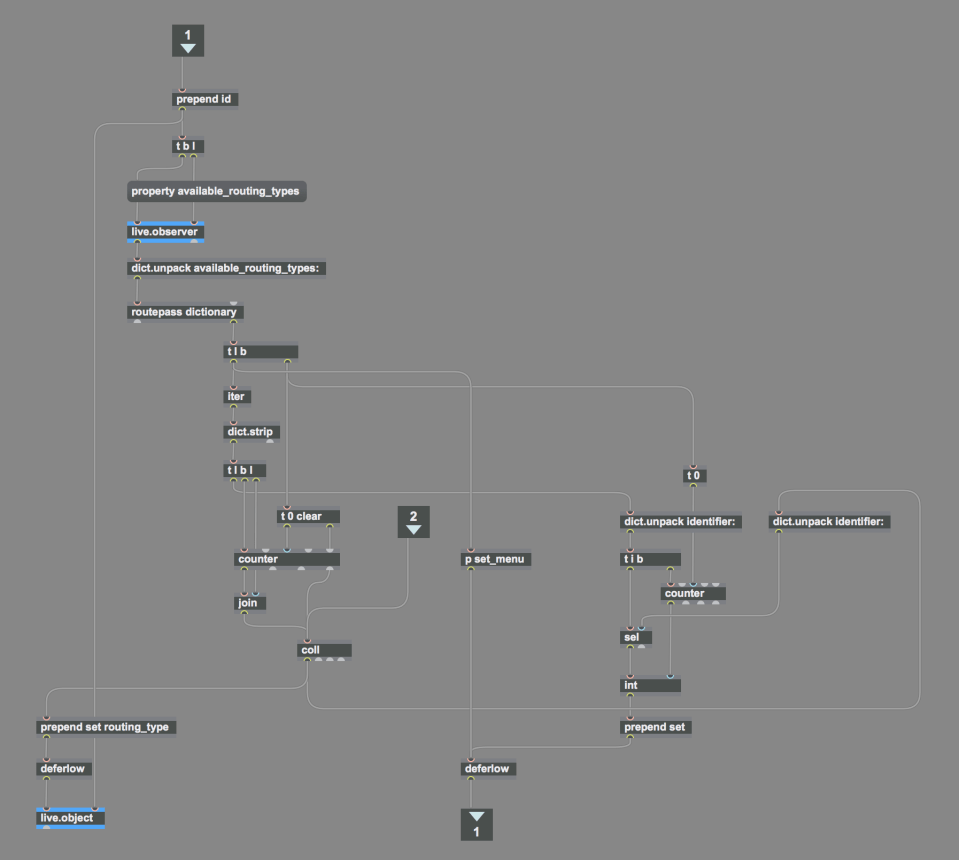
Here is a more complete patcher from the device. A live.observer is being used to watch and report any changes to the tracks that are available in Live. The available tracks (available_routing_types) are stored in a coll object in the format of dictionary references. Counter is being used to create a numerical index for each dictionary reference. The list of available tracks is also being added to a live.menu (in the top level patcher).
When a track is selected in the live.menu it feeds an integer number back into this patch causing the associated dictionary reference to be outputted from coll. From there the dictionary reference is combined using prepend to create a message that reads “set routing_type dictionary u517000943” for example. This is sent to our live.object which represents one of the designated audio input pairs on our plugin~ object and voilà, we have changed our audio input.
Further Reading
Live Object Model (LOM) https://docs.cycling74.com/max7/vignettes/live_object_model
What is Max? https://cycling74.com/
Getting started with Max for Live https://help.ableton.com/hc/en-us/articles/209070309-Installing-and-getting-started-with-Max-for-Live
Max for Live Ultimate Zen Guide https://leanpub.com/Max-for-Live-Ultimate-Zen-Guide

This is a great tool, very helpful. Thank you for releasing it for free and explaining how you made it, it pushes me to get more into Max For Live programming 🙂 I was always wondering if it’s possible to expand M4L devices. So in this case expand the scope like you can do in EQ8 for example. Best would be if the scope could be in a floating window for the second screen.
Hi there, thanks for checking it out. I have made a floating window version similar to your description. One of the issues is that it makes the GUI a little laggy in Live. I am still tinkering though, so if I get it stable enough I will release it as an update. Thanks again.
That’s nice to hear. Meanwhile I will happily use it like it is now. It’s really useful.
Hi Mark, thanks for making this tool. As Hauke mentioned earliear, a floating window for a second monitor would be really useful. Can’t wait to see the new update you are working on.
Thanks Oscar!